|
Baby Food Jar Crafts:
|

Materials used in this baby food jar crafts tutorial:
- 6 oz. baby jar
- LED tea lights
- 8 oz. paper cups
- decorative paper or fabric
- ribbon or trim
- pipe cleaners
- glue
Start by removing the label from the baby food jar. There's always a bit of glue stuck on that you will need to scrub or scrape off. I rubbed most of it off with a utility knife (be careful) and then used regular old dish soap to scrub the rest off
Next get out a couple of 8 oz. paper cups. One will be used as a template and the other will become the lamp shade for the baby night lights.
To make the template use a craft knife to remove the bottom of the cup. Next use your craft knife or a pair of scissors to cut a straight line up the side of the cup. I also go one step further and trim the lip off of the top part of the cup. Not too short or your template will be too small.

Fold the cup out flat over the decorative paper or fabric you intend to cover the "lamp shade" with. Using either a pencil or some sewing chalk trace the outline of the cup onto the paper or fabric. At either end you will want to extend the pattern just about a 1/4". Cut out the paper or fabric.

Apply a bit of glue to the back of the paper or fabric to attach it to the makeshift lamp shade. I like to use a permanent adhesive glue runner to apply a few vertical lines of glue at intervals across the paper.
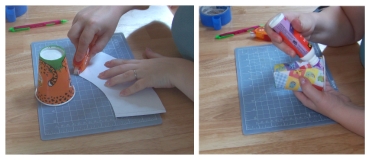
Attach the paper or fabric to the paper cup holding it flush with the bottom of the cup (top of baby night lights lamp shade). Press firmly to hold it in place. Finish up by adding a bit of glue to the end flap and press this down to seal it.
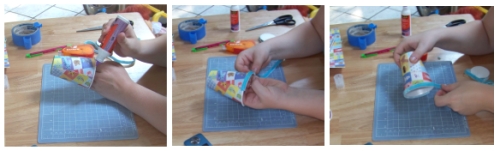
Apply a small bit of glue to the lip of the mouth of the cup. Make sure the glue extends all the way around to meet at the other side. I like to use a simple white glue with a thin applicator tip.
Press the ribbon trim into the glue and wind it around the entire mouth of the cup until it meets on the opposite side. Trim the ribbon about an 1/8" over from the opposite end. Apply a small bit of glue and press it gently to attach it.
Wind a pipe cleaner around the outside of the jar about an 1" and a 1/2 from the jars opening. Twist the end to secure the pipe cleaner in place. Bring the opposite end over and secure it in place the same way. Press the ends in towards the jar.
Drop your LED tea light into the jar and place the DIY lamp shade in place. Viola! Simple and super cute baby night lights!

The lights I used for this baby food jar crafts tutorial are quite inexpensive and can be found at most crafts stores or even the craft aisle in stores like Wal-mart. They are battery operated and even have a small light switch on the bottom. They can be used over and over again! The light they give off is supposed to mimic that of a flame of an actual tea light. Perfect lighting for baby night lights. They also make super cute diy nursery decor!

go from Baby Food Jar Crafts - Baby Nigth Lights
back to DIY Nursery Decor page
go from Baby Food Jar Crafts
back to Homepage