 |
||||
|
Fabric Stash Project:
|
||||
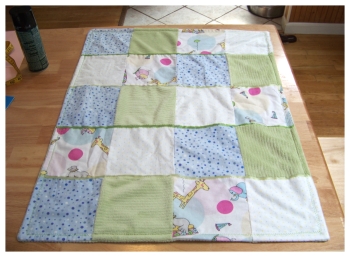 This patchwork baby quilt is such an awesome way to use up all those bits and pieces left over from other sewing projects. You can make a totally crazy quilt made from tons of different left over fabrics, or scavenge as much from each project as possible to make a quilt with coordinating colors and patterns. Not only will you find those fabric scraps put to god use, this quilt makes a fabulous baby blanket, nursery wall decoration, or a gorgeous baby gift.
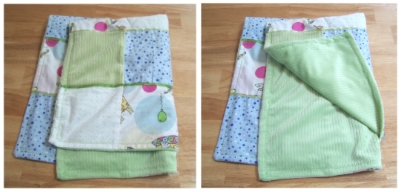
To make this patchwork quilt simply pick out a few different fabrics that have coordinating or matching colors and patterns. For a really luxurious blankie I like to choose one heavier fabric such as fleece or faux minky fabric to use as both a backing and to add texture to the quilted side of the blanket. It is not fully necessary to choose a heavier fabric, although it does give the quilt that luxurious soft feeling and adds a bit of texture as well.
So, you'll choose one fabric to be used as the backing of the quilt (you will need one large piece of this particular fabric). I used one full yard for the backing of the quilt.
For the opposite side of the quilt you can choose to purchase fat quarters or 1/2 yards, or use up your scraps. These will be cut up into squares or strips to form the patchwork quilt. I chose four separate fabrics for my quilt. They were all left overs from a few other nursery projects I had worked on previously. So, Bonus! I got to make a quilt that totally matched the rest of my nursery!
How To Make A Baby Quilt
Whether you choose to make a baby quilt from your fabric stash leftovers or buy special fabric just for this project, there are different ways you could go about creating the patchwork.
Make a Fabric Stash Quilt
Your going to create a square block to use as a baby quilt pattern. Really this just means cutting out a square shape from heavy paper or cardboard. It should be a complete square. Make this as big or little as you like. I made mine 7" by 7" and cut it out of cardboard to make a nice sturdy baby quilt pattern piece. Or you can print and use this supersimple quilt block pattern and skip a step.
How big you want to make your quilt is entirely up to you. It really doesn't need to be all that big since it will be used to wrap around tiny humans. I made mine about the same size as a receiving blanket.
Start by cutting all of your corresponding fabrics into squares using the baby quilt block "pattern". To sew the quilt together just sew the squares together, end on end.
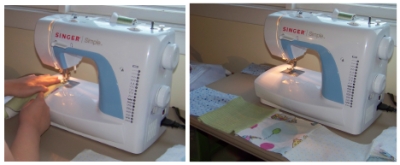
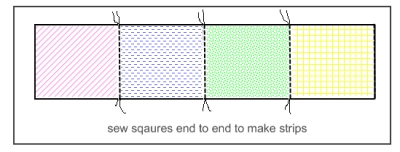
Next I held both strips so the tops were facing, pinned it and sewed the strips together the long way. Keep sewing squares together end to end to create another strip, and add it on to the end of the quilt until you are satisfied with the size of the quilt. Make sure that all of the stitching has the same seam allowance.
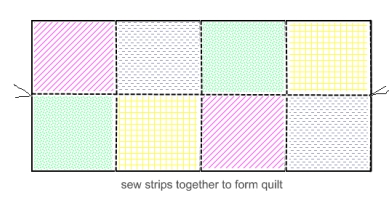
Making A Baby Quilt With Fabric Strips
If you have rather large pieces in your fabric stash, or you've purchased fabric to make a baby quilt, then you can make your crazy patchwork quilt the old fashioned way - with fabric strips.Making a quilt by sewing strips of fabric is just as easy, if not easier than by using the block method I described above. All you have to do is cut long strips of fabric all at the same width. Say, long strips of fabric that are 5" long for example. Sew the strips together the long way, creating a sort of striped quilt piece. Then, with a yard stick or quilting ruler, cut the blanket into 5" strips all over again going in the opposite direction creating a long strip of fabric squares sewed together. Now all you have to do is sew those strips back together and you've got yourself a patchwork crazy quilt - baby sized.
Finishing The Baby Quilt
Once all of the quilt squares are sewn together, well this is where I like to go back and add a bit of detail before finishing the quilt up. For this particular quilt (pictured above) I picked two matching ruffled ribbon trims. I sewed them across the quilt to just cover the seams where the squares meet and are sewn together. I also tied some teeny bows and hand sewed them onto the seams in a few places where the fabrics all met together. It all made for a very sweet look.
from there I took the quilt to my ironing board and smoothed everything out paying close attention to the edges of the blanket. I took it to my sewing machine to give it a last step finished look. I zig zag stitched about 1/2" in from the edge creating a border around the entire baby quilt. I used a nice bright matching thread to give it a bit of decorative edge.
Make Your Own Baby Stuff Homepage > Make Baby Bedding > Baby Quilt


Fun Projects and Tutorials


Then why not use the button below, to add us to your favorite bookmarking service?