 |
|||||
|
Refurbishing Used Baby Furniture: The Baby Crib Project
I have been hitting many second hand stores, consignment shops, and even antique shops looking for suitable baby nursery furniture to refurbish. #1. It saves me a ton of money. #2. Buying used baby furniture is a lot like recycling, isn't it? It's eco-friendly! A big plus in my book. #3. I just don't trust a lot of the baby furniture out there lately. There seems to be recalls and horror stories constantly. The crib I used last year for my daughter was recalled. They ended up simply sending a new piece to attach to it. But I read that they were still under investigation for a separate matter on the same baby crib that had already resulted in deaths. And then there is the matter of the finish they use on the cribs. After m y daughter started teething she actually chewed the finish right off the side of her crib in mere minutes. Who knows what kind of chemicals are in that stuff? There are still concerns for used baby furniture too. Be wary of used baby cribs. Do some research and know what you are buying. It is important to make sure that there are no gaps big enough for a baby to become trapped in. This is hard since many used cribs are disassembled when they are on sale.
My Used Baby Furniture Rehab Project
 The crib started off with a wood stain and polyurethane finish. Who knows how safe this might have been? Let alone the fact that it was worn and slightly dirty.
I dropped by Lowe's for a few supplies before I started on this project. I needed a drop cloth, some sand paper, some paint, and a small paint brush. My intention was to paint the crib white. White would work best against the color of the nursery walls and also with the fabric I chose to sew my own bumpers.
I did all of my painting outdoors. While pregnant it is not recommended to inhale many paint chemicals. Try to keep your used baby furniture refurbishing projects as natural as possible. Buy natural paints and stains. Latex paint is water based and less toxic. You could even go for a craft paint which is acrylic and the least toxic. Doctors generally recommend that if you must paint while pregnant that you do it in a well ventilated area. What's better than outdoors? Or better yet, have hubby do it. :) I started by placing a biodegradable drop cloth down to protect my patio. I anchored it in place with some rocks from the garden. While painting make sure the brush is the correct size. If it is too big you'll end up with a sloppy looking coat of paint. If it's too small it will take you forever to paint the entire thing. Make even brush strokes being careful not to slap on too much paint. If there are drips they will dry that way and look messy in the end.
From there I added some baby bedding to finish the whole project off. First was to take care of the crib mattress itself. The crib came with a mattress of it's own but I wasn't sure if I trusted it or not. I'm really not sure how old the mattress is since the crib itself was definitely a vintage piece, and no idea of what the mattress is made of. I took it upon myself to make my own crib mattress. Especially for the simple fact of, "Where the heck would i find one that would fit this crib anyhow?" To top it all off I added my own handmade baby crib bumper pads!
If you want to go totally natural and organic with your paints the safest and most non toxic paint you can get would probably be Milk Paint. It comes as a powder which you actually mix with water to create a pint of paint. Mix it with white milk paint and other colors until you get your desired color. All you need do is add a clear finish coat at the end to seal it and prevent water staining. Totally green and eco-friendly, not to mention baby friendly. You can find it online at Our Green House - natural & organic products for the home and baby. Looking to stain hardwood used baby furniture instead of painting it? All you have to do is strip the finish from the wood when you are sanding. If there is a thick paint finish you might want to apply a stripping agent, although it's probably safer to just sand it away. For heavier jobs use a palm sander. They are not too expensive and easy to use. Just make sure and wear a mask so as to not breath in any of the dust. Use a stain (especially natural stains without any polyurethane mixed in for an organic finish) and seal with an organic glaze or polyuroseal safe wood finish. You can get those at Our Green House too!
go from Refurbished Used Baby Furniture back to DIY Nursery Decor
|
|
||||
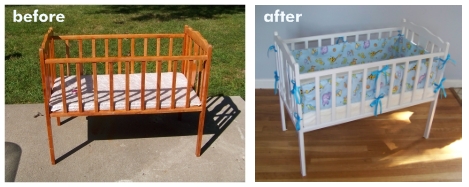
 On one of my last shopping jaunts I came across a small baby crib which I made my newest project. The crib is not a full sized baby crib. It's only slightly larger than a bassinet. It is made of very sturdy and solid wood and the bars were spaced quite close together so no worries there. The mattress is not meant to be lowered, and neither are the sides of the crib. I bought this crib for only $19.00! It was pretty cute all by itself if you like shabby chic style, but I had visions of my own. Here's what I did to turn this little diamond in the rough baby crib into a gem fit for my new DIY baby nursery.
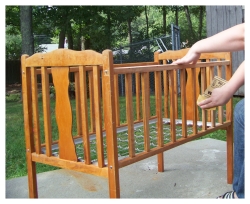 After sanding the entire baby crib down I went back over every inch with a damp cloth to get rid of any dust. I left it out to make sure any dampness would dry before I began.
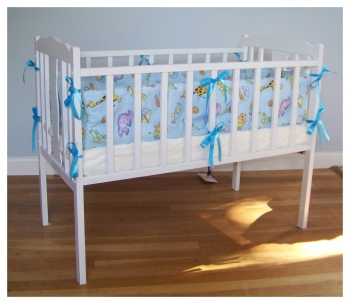


Then why not use the button below, to add us to your favorite bookmarking service?