DIY Baby Nursery Picture
Frame Ideas
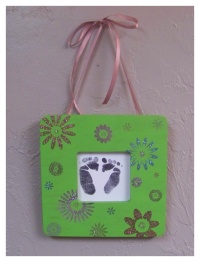 Make a Baby Nursery Picture Frame
Out of Old or Unfinished Picture FramesWant to make your own baby nursery wall decor? You can do this and it can be both easy and inexpensive. The frame on this page was actually made from using an unfinished wood frame. It's amazing what you can do with these kind of picture frames. Picture frames in this style are basically blank canvas to work with. So, take this unfinished wood frame and turn it into a themed or decorative baby nursery picture frame!
Here's how did it:
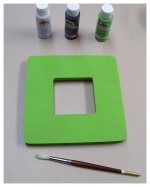
I started by shopping for materials. I bought some acrylic craft paint to start with. I like acrylic paint the best for crafts. It is water based so that makes for an easy clean up. It is easy to clean off of your brushes, and off of you.
I knew I wanted to paint it green so I bought the basic green paint along with a tube of both white and black as well.
I could stop at simply painting the frame, but I wanted to add a little pizzaz! Luck would have it that the clearance section of the crafting department happened to have some rub-ons. I absolutely love rub-ons. You can apply them to so many kinds of surfaces. There are so many uses
for them! The one's I bought for this project were extra special because they were glitter rub-ons! They were actually adhesive rub-ons that you apply glitter to after they have been applied. Even better!
If you do not already have them you may want to pick up some small paint brushes. I keep a set of craft brushes just for these kind of projects. It is generally best to buy a set that is not the cheapest on the rack. The cheaper paint brushes tend to have brisell falling out and it messes up your paint job. In turn this costs you more because you will end up throwing them out and buying another set. Also, it costs you the wasted time and effort.
Once you have all of your materials it is time to get started. Pick a nice spot to work in. If you are afraid of getting paint on anything it's a good idea to lay down some newspaper on your work surface.
You should have a paint brush to work with, some paint, a paper plate, paper towels, and a cup of water for cleaning your brush.
I had to mix my paint before hand to get the right color. You do not need to do this if you can find a paint that is just the right color for your project. Or if you are not too picky. I am. :)
If you intend to mix the paint then a paper plate comes in handy for this. Start by adding a good dollop or two of your primary color, and adding to it to mix. I was using green, but I wanted another shade of green. I added black to make it a little darker, and white to make it a bit brighter.
Give the entire outside of the frame a good two coats of paint. Another great thing about using acrylic paint is that it dries really fast. By the time you come full circle the paint will be dry, and you can start all over again.
After you have applied at least two coats leave the frame to dry for a while. Even though it does dry fast, it is best to let it get really dry before adding any rub-ons. It would be a shame to lose any of the rub-ons to a pocket of wet paint.
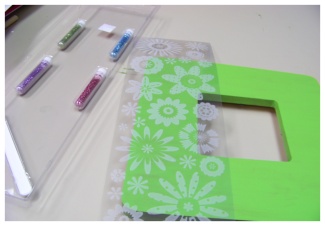
When applying any rub-on it is best to cut the shapes apart individually (with the backing still applied). Once all of the shapes are free you can get a feel for how to arrange them by simply laying them on top. When you find an arrangement that you like, one by one peel off the backing and use your rubbing tool to adhere them to the surface.
The rub ons I used for this baby nursery picture frame were glitter rub-ons, so I had to apply the rub-on, and then apply glitter. Let me tell you, when working with glitter; It gets EVERYWHERE. I will be finding glitter under my fingernails, in my daughters hair, and stuck to my skin, for the next several weeks! But it is all worth it in the end, and it's fun too.
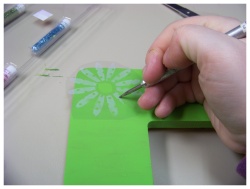 If you happen to find these glitter rub-ons and use them in this project let me give you a couple of tips. First off, have a lot of scrap paper on hand to place under the project when you are working. You can shake the excess glitter off onto the paper and drop it back into the container to conserve your materials.
Work with just one shape at a time. By this I mean, 1. cut one shape out, 2. rub the shape to adhere onto the surface, 3. dump on glitter and press into the shape, 4. shake the glitter off and wipe the surface clean, 5. start all over again.
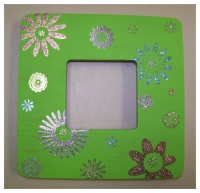
To make the middle of a flower shape a different color then the outside, cut the middle shape independent from the entire shape. For some this can be tricky. It is much easier if you have a razor or cutting knife like Xacto.
The last step to making these baby nursery picture frames is to add the ribbon to use to hang it on the wall. I think this is a nice touch. I love working with ribbon :)
Just choose simple ribbon of a medium to large width. Choose a color that nicely compliments the frame and baby nursery picture. You can attach it to the back of the frame by either using a staple gun, or even thumb tacks. Masking tape has even worked quite well for me. But you have to attach it by long lengths onto the back of the frame. By this I mean that about 5 inches or more of ribbon should be laid across the back of the frame, and then taped down in several spots to hold it firmly. I definitely would not do this if you plan to hang the baby nursery picture above the crib or where anyone may be sitting. Just in case.
Once your ribbon is firmly attached to the baby nursery picture frame, tie it in a slip knot somewhere near the top, and top it with a bow. Place a picture or handmade art of some kind and you're done!
go from DIY Baby Nursery Picture Frame
back to DIY Nursery Decor page
Back to Homepage