|
Make Your Own
|
 I'm going to show you how to create quick and easy baby nursery wall decor using materials that are generally easy to find.
Materials needed to create DIY baby nursery wall decor:
shadowbox picture frame
card stock
decorative paper
3 dimensional scrapbooking embellishments
glue runner or craft glue
Shopping for and choosing your materials...
Shadowbox frames - These are picture frames that are made so that the picture or focal point is set back 2 or 3 inches from the glass. This kind of picture frame is ideal for showcasing art that is textured or 3-dimensional. You can probably find good deals on frames like this at many departments stores, and home decorating stores. I got the one I used for this project at Ikea.

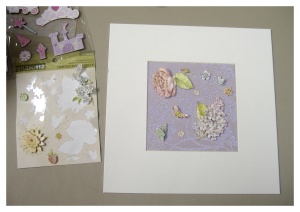
Decorative paper - I actually used two different papers for this project, but what you use is up to you. I used a thin lilac colored card stock to set the background, and then layered a decorative vellum paper on top of that. Whichever paper you choose to use keep in mind that it is simple a backdrop. You will be layering other decorations on top of it.
A great resource for finding great decorative papers is arts and crafts stores or scrapbooking/cardmaking supply stores. They sell these papers by the sheet which will also keep you expenses down.
Scrapbooking embellishments - You can find these online or at most arts and crafts stores. You can even find them at stores like Target and Walmart in their arts and crafts sections. Scrapbooking embellishments are great! They are completely ready made usually complete with adhesive on the backing so all you have to do is peel and stick. Many are pop-up 3 dimensional kind of designs made with interesting fabrics and materials. This makes them perfect for this baby nursery wall decor project. Also, they come in many, many themes. Everything from Disney characters, to kid's and babies themes, and beyond. If you shop around at bargain stores you can find them for super cheap. The floral embellishments I used for this project only cost me $1.00.
Start by dis-assembling the picture frame. When you turn the frame over there should be some small metal tabs holding it shut. Either bend them upwards or turn them to the side, depending on the specific frame you purchased.

Remove the chipboard backing. Under this should be another "frame" like piece. If not, you can easily create one by cutting card stock down to the same size as the frame.
 Now is the time to get out your chosen decorative papers and card stock. First place the card stock down on a your work surface. Place the inner frame from the shadow box over the card stock. Use a pencil to trace a square guideline onto the card stock. Use this pencil guideline for placing your artwork correctly.
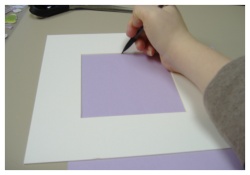 Use a pair of craft scissors to cut just outside of this guideline. You should have about an inch of paper between the guideline and the edge of the card stock.
Now use this same method for sizing the decorative paper. Place your decorative paper so that it is face down onto your work surface. Place the inner frame over the paper and use it to trace the same guideline onto the paper.
Use your scissors to very carefully cut the paper into a square to fit into the inner frame. This time you will cut perfectly right on the line rather than outside of it.
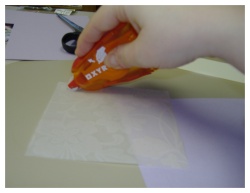
Take the decorative paper you just cut and place it face down onto your work surface. Use a permanent adhesive glue runner to apply adhesive to the back of the paper. You only need a minimal amount to do this effectively. It is most important to apply adhesive close to the corners of the paper, and a dab to the middle.
Attach the decorative paper piece to your card stock backing just withing the pencil guideline. Now use your glue runner to apply adhesive to the outer edges of the card stock backing.
Place the card stock backing and decorative paper down
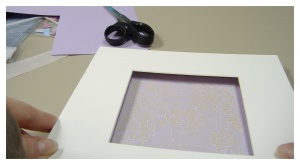
face up on your work surface. Take the inner frame and very carefully place it over the card stock piece so that the decorative paper shows through. Apply firm pressure to thoroughly stick the adhesive.
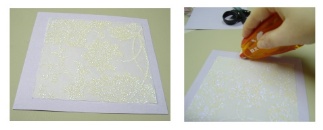
Now it is time to add the scrapbooking embellishments. Most of these embellishments come in a pack with many theme oriented images within them. Find a clever way to arrange them onto the decorative paper. A good way to experiment with this before removing the adhesive backing is to cut the embellishments out with the backing still intact. Use a pair of precision cutting scissors or an Xacto knife.
After you have cut them out, play around a bit with how to place them onto the paper. Try placing them diagonally askew from each other, or even overlapping some pieces. Once you find an arrangement that looks pleasing to the eye. Remove their backing and stick them onto the paper one by one.
Now that all of your art is in tact all you need to do is put your frame back together and find a good place to hang it!
Remember, you can create baby nursery wall decor to match any theme with this project. Ge creative and who knows what kind of art you may create.
go from Baby Nursery Wall Decor back to DIY Nursery Decor
go from Baby Nursery Wall Decor back to Homepage