


Make Your Own Candy Bar
|
Of course, you will need some candy bars too. I used Hersey bars to make mine, but any flat candy bar will do. Just make sure and buy a candy bar that has an inner and outer wrapper. The Hersey bars usually have an inner foil wrapper, and an outer printed label.
Once you have your candy bars and the rest of your supplies in hand, you are ready to assemble the baby announcements.
Turn your candy bar over and very carefully remove the outer label. I recommend using a cutting blade or some sharp skinny scissors.
Use a ruler to measure the dimensions of the label. This is how you will know what size to make your own labels. Add an inch or so to the length of the wrapper to give room for the wrapper to overlap when wrapping it back around the candy bar.
Cut your decorative papers to the correct dimensions to form candy bar wrapper labels. You can cut them yourself if you do not mind doing the work. You can also outsource the work if you would rather focus on assembling the candy bar announcements. By this I mean take your paper to a local copy or print shop to have it cut for you. These shops usually have a cutting machine that will cut your paper perfectly and in minutes. It's affordable too.
 Once your papers are cut the next step is to affix the paper back onto the candy bar. Easy! place your paper down on a work surface facing bottom side up. Now place your candy bar on top of the paper, also bottom side up. Wrap one edge over the side of the candy and hold firmly in place. Use your glue runner to apply a strip of adhesive down the edge. While still holding the paper firmly in place fold the opposite edge over on top and press into place. Viola!
Now, to turn these candy bars into baby announcements. If you bun is still in the oven you can stop here. Put your half done candy bar aside until the baby is born. At least you will be half done!
Otherwise it is time to add photos and the baby announcement wording. I used a simple word processing program to print the wording out. If you do not already have this software on your computer you can get it for free at Openoffice.org.
Setting up the wording is easy. Just open a document in your word processor by choosing File > New. Type out the wording. I used the words "It's A Girl" but you can really use anything you want to say. Underneath this type the baby's name, the birth date, the weight and measurements, etc..
Center all of the text. Change the size of the main title to a larger size. You can change the fonts too. Basically just play around with it until it looks nice to you. You can copy and paste it several times down the page to conserve paper. You can even set up double columns on the page so you can use up even more space on the page. Make sure and leave a good few inches between each set of wording.
 Print the wording out and then cut the paper to create individual rectangles with the wording printed onto them. Be very careful to make sure the wording is centered on each rectangle. Using a sliding paper cutter, or even a ruler and Xacto knife will make this job a lot easier.
You will also need to print out some baby photos to make these candy wrapper baby announcements. Don't worry, you don't actually need to use photo quality paper for this. Of course, you can if you want, but it saves money to use plain old printer paper. It still comes out looking nice too. Just make sure and choose the highest quality settings on your printer.
I recommend opening your chosen photo in a photo imaging software to print the photo. Not only can you crop the photo so it is exactly the size you want it, but you can also choose a printer setting that will allow you to print the photo duplicated many times on one piece of paper. If it does not you can also copy and paste the photo. I like to use a program called Paint.net which is available on the internet for free. Just Google Paint.net to get the free download. Print the photos out and cut them to size to fit onto the candy bar.
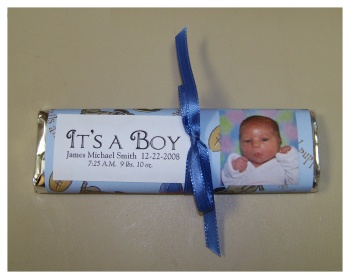
After both the wording and photos have been cut down to size, you will then attach them to the candy bar. It is easiest to use a glue runner to apply a bit of glue to the back and simply put them in place and press down. Leave a space in the middle for a ribbon to be tied.
Last step! Simply cut a piece of ribbon long enough to tie a bow around the candy bar. Place the bow so that it is in the middle between the wording and the baby photo.
go from Baby Announcements back to Baby Crafts page
back to Homepage