|
|||
|
Make Your Own Diaper Bag PatternDesign Your Own Custom Baby Bag
You also get to pick out fabric to suit your tastes and still save a ton of money over a store bought diaper bag. There are plenty of heavy weight fabrics to choose from, and even faux suede and leather. Denim is another nice choice. I, myself, like to simply double up on plain old cotton. I like to make mine reversible! Want to make a waterproof bag? Go with PUL fabric. It works like a charm for wet bags and even making cloth diaper covers.
This is actually quite simple! I thought about creating a printable diaper bag pattern for you all, but really, it is just as simple to create your own diaper bag pattern. And it will take just as long as printing all of the pieces, putting them together, then cutting them out. Got some large craft or construction paper handy? You can even use simple newspaper. That's what I usually use. what you'll need to make a diaper bag pattern:
First you'll need to calculate how large you may want your diaper bag to be. I like mine to be wide and very deep too. I have to cram enough stuff in there for both a 2 year old and a newborn :)
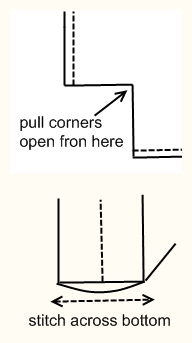
 OK here's the equation: Check out a tape measure and figure out how wide you want the front of the bag to be as well as how deep from top to bottom. Come up with a figure? Good write it down.
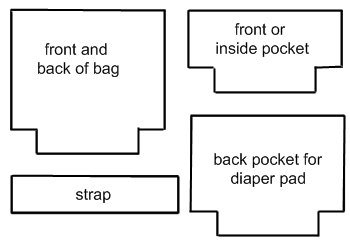
Now you'll need to figure out how wide you want the inside of the bag to be. Add half the width to both the width and length of the front of the bag measurements. Now measure and cut a rectangle of this excact dimension out from your newspaper. Need help? I came up with the measurements of 15" long by 18" width for the front of my bag. I know I wanted the bag to be 7" wide on the inside from front to back. Plenty of room for my diapers, wipes, onesies, blankets, etc... Got your rectangle cut out? Great! Now fold it in half width wise. Lay the folded rectangle down so that the fold is on the left. Now measure out a square at the bottom right hand corner measuring half the width of the inside of the bag. For me this is 3.5". Cut the square out from the paper and open the diaper bag pattern piece back open flat. It should look like the diaper bag pattern diagram on this page. Now you've got your basic pattern for a tote bag or a very simple diaper bag pattern! Want to add pockets? Easy. Now just hold your pattern piece over a fresh piece of newsprint and trace the bottom part of the diaper bag pattern. Basically, just create the same pattern piece, except this one shorter than the first, depending on how big you'd like the pocket to be. Do the same for each pocket piece that you create. I made one smaller pocket pattern piece for the front and inside of the bag and another larger piece for the back of the bag to hold my handmade diaper pad. You can also choose to create a flap to fold over the top of the bag, although simply sewing on a zipper or snaps will work fine too. To make a flap simply measure the width you'd like the flap to be (a tad bit shorter width wise than the actual bag) as well as the length from the back of the bag to the front, so that it covers the front pockets. The last diaper bag pattern piece you create will be for the strap to hold your bag. For this you merely need to cut out a long rectangle. I made mine about a foot and a half long by 4". You may also want to cut some batting of the same lenght and half the width to create a padded strap.
How To Make Your Own Diaper Bag First you'll need to use your pattern to cut out all of your fabric. Fold your fabric in half so that the right sides are facing together. pin the pattern piece down and cut four pieces for the body of the diaper bag. Since you folded the fabric in half you will be able to cut out two pieces at a time. Now, on to the sewing... After cutting all of the pattern pieces out you will be left with your fabric pieces doubled up facing right sides together. This is just how you want them. Start by straight stitching the top hem on each and every piece of fabric. Stitch the top of the front and back, as well as the top of each pocket. Take these to your ironing board and turn them each right side out and iron the hems flat. The last piece to sew is the flap if you decide to make one. Simply sew all four edges together with right side facing, leaving a space about 1 - 2" open for turning. Turn the fabric inside out and iron it. Hand stitch the opening shut. Next stitch the flap to the back of the bag. You will want to place it about 3/4's down the bag of the bag so that the seam will be hidden when sewing on a back pocket.
 Now to sew on the front and inside pockets. Line the pocket pieces up with the front of the bag,on either side both inside and outside. Pin them in place. Fold this in half and place a pin vertically right in the middle of the fabric. Measure half way from the pin to either side of the piece and make a mark with some fabric chalk. This is where you will sew the pockets together. Sew vertically from the top of the pocket to the bottom of the bag. This will create three separate compartments on both the inside and outside of the bag. For two larger compartments simply sew straight up the middle.
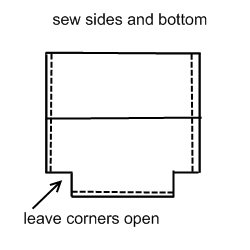
Now the assembly of all the pieces. First lay the back pocket onto the back of the bag so that it covers the seam on the flap, lining it up with the bottom of the bag. Pin these in place. Flip this over and lay it flat with the pocket side facing down. Now place the front of the bag on top of this piece and pin both in place. Sew just the sides and very bottom of the bag, leaving the corners open. To finish the bag turn it inside out and sew down any loose fabric using a zip zag stitch, to give it all a more finished look. Turn the bag right side out again and sew on the strap. I like to reinforce the strap with many stitches to make sure it stays on well.
go from Diaper Bag Pattern Tutorial |
|
||
|
Enjoy This Site?
Then why not use the button below, to add us to your favorite bookmarking service? 


[?] Subscribe To This Site
|
|||
|
|
|||
|
| |||
 I love to make little handbags and totes but what really persuaded me to make a handmade diaper bag were all the recalls I heard about on the news. Apparently, many of these diaper bags were found to have dangerous amounts of lead in them, and also in the diaper pads that come with them. Just another great reason to continue to make piles and piles of your own handmade baby stuff. But I also love the idea of being able to make a diaper bag custom made to my own needs and specifications. I make the pockets to go where I want them and as many as I want. Make your diaper bag custom to whatever is convenient in your everyday life.
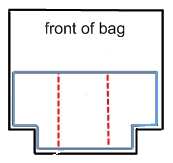 Also Iron the fabric set aside for the strap by folding it in half with right sides facing, and ironing flat. Sew the outer edge all the way from one side to the other. Turn this piece right side out. Next fold in the ends by about a 1/4" and iron in place. Stitch across the end of the fabric. Repeat this for the opposite side.