|
Baby Headband Pattern
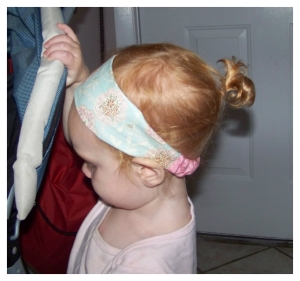 Making these stretchy cotton baby headbands makes foe a perfect baby sewing project, and a great project for beginner sewers. You can even enlarge the baby headband pattern to make an adult sized headband. I make these all the time for me and my little ones. An absolute fave and go-to for keeping hair out of baby's eyes and for Mommy's bad hair days. Making these stretchy cotton baby headbands makes foe a perfect baby sewing project, and a great project for beginner sewers. You can even enlarge the baby headband pattern to make an adult sized headband. I make these all the time for me and my little ones. An absolute fave and go-to for keeping hair out of baby's eyes and for Mommy's bad hair days.
I think these headbands are even cute for boys if you are growing his hair out to a longer length. He can be a little rock n' roll baby!
These are so simple and easy to make, you almost don't even need a pattern. I've provided a pattern for this project just for a quick way to skip a step, but they are so easy to make. You could easily make your own pattern for more of a custom fit.
What you'll need:
- fabric scraps (1 or 2 different colors)
- 1/2" width elastic waistband
- sewing machine, thread
Print the baby headband pattern and trim the pieces from the paper. There is a pattern for 0-3 months and 6-12 months. For bigger sizes you can enlarge the pattern sizes. It's such a super simple pattern so adjustments will be easy and there is lots of room for screw-ups.
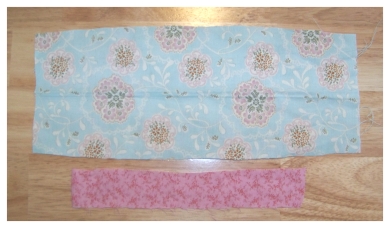
Cut the fabric out using the pattern as a guide. I like to use two different complimenting coordinating fabrics. Give the front piece of headband fabric a pass over with a hot iron, and fold the second (back of headband piece) in half lengthwise and iron a crease on the fold.
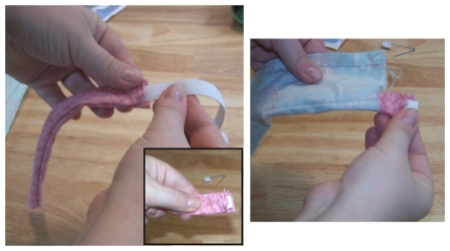
 Using a hot clothes iron fold one edge (left or right) of the "front of headband" piece over by around 1/4-1/2" and iron in place. Fold this piece in half lengthwise with right sides facing and sew a seam along the outer edge with a 1/4" seam allowance. On the second (back of headband) piece sew a lengthwise seam also with a 1/4" seam allowance. Both pieces will form a tube of sorts. Pull both pieces right side out. A trick I use to make turning easy is to insert a safety pin in one end and push it through to the other end. Then, simply pull it out the end. Using a hot clothes iron fold one edge (left or right) of the "front of headband" piece over by around 1/4-1/2" and iron in place. Fold this piece in half lengthwise with right sides facing and sew a seam along the outer edge with a 1/4" seam allowance. On the second (back of headband) piece sew a lengthwise seam also with a 1/4" seam allowance. Both pieces will form a tube of sorts. Pull both pieces right side out. A trick I use to make turning easy is to insert a safety pin in one end and push it through to the other end. Then, simply pull it out the end.
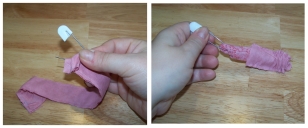
Cut a piece of 1/2" wide elastic. I like to cut it a little long and then trim it to the right size after doing a quick fitting on the baby. Insert the end of the elastic into the middle of the smaller piece of fabric. Now insert this piece (fabric and elastic) into the larger piece of fabric at the end opposite of where the fabric is folded in (a.k.a the edge that is left rough).
Hand stitch a loose basting stitch around the larger outer fabric's edge and pull the threads to bunch the fabric up a bit around the smaller fabric and elastic.
Sew across the end of all the fabrics to fuse them together. Turn the entire thing inside out. Now (if possible) you are ready to do a quick fitting to get it to the perfect size your baby's head.
 First things first, pull the end of the elastic out of the opposite end of the fabric so that you are scrunching the fabric up around the elastic a bit. When you get the desired length of elastic pin it in place. You can choose to trim the elastic as well if need be.
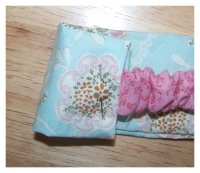
Sew another loose basting stitch around the end of the front headband piece. Insert the end of the back of head piece and pull the threads to bunch the fabric around it. Pin in place and also remove the pin holding the elastic the goal is to pin both fabrics and the elastic together. Do not remove the inner pin until you have successfully positioned the outer.
Sew all fabric and elastic in place and remove the pin. Viola! You can use this baby headband pattern to whip up cloth baby hair bands to go with every outfit!
Make Your Own Baby Stuff Homepage > Make Baby Accessories > Baby Headband Pattern
|