 |
||||
|
Baby Pinafore PatternThis baby pinafore pattern is very easy to make. I like to make reversible pinafores. This way you practically have two pieces of clothing for baby's wardrobe all in one shot. These are great for layering over onesies or wear them alone as is. You can pair them with some cute pants or leggings, or with a cute diaper cover.
First you want to sew the pieces together at the sides, pairing one front to one back at a time. Sew them with right sides together. Here is where you will want to get your iron and ironing board ready. After turning your pieces right side out, you will want to press the seams nice and flat. Also iron the bottom edges over about a 1/4" to 1/2", facing inwards towards the inside of the pinafore. After ironing pin the bottom edges placing front to front and back to back. Sew a seam along the entire bottom of the pinafore. A nice detail to add is some matching rick rack which you could also sew along this seam. To finish gently press the bottom seam. You'll also need to create a way for the straps to attach together. Sew button holes and buttons, or snaps will work just fine. I've used ribbon to create pretty ties at the top. You'll need a nice thick ribbon and it will need to be sewn in before hand. You can even use velcro. :) Optional Step: Create Pockets For the Pinefore! To add pockets to the pinefore you will need to create them and then sew them on at the start, before you sew the pinefore pieces together at the sides. I think they look super cute, and they can be really fun to make in matching and coordinating fabrics. Cut four pieces using the pocket pattern piece. Place the peices right sides together and sew about a 1/4" in from the edges, leaving a space for turning. Turn the pieces right side out and stitch the opening shut. Iron the pockets flat around the hems. Now pin them onto the front of the pinefore using the pattern for correct placement. Sew them onto the pinnie by stitching as closely to the edge as you can get.
|

|
|||
|
Enjoy This Site?
Then why not use the button below, to add us to your favorite bookmarking service? |
||||
|
|
||||
|
| ||||
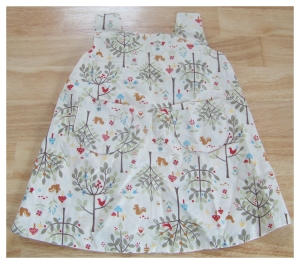 What you'll need to make the baby pinafores:
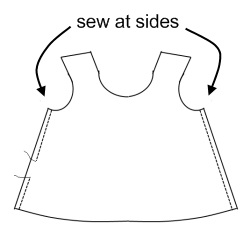 To make the reversible pinafore dress, start by downloading and printing the
 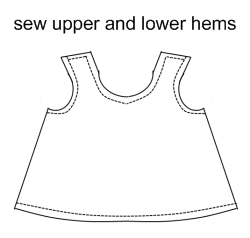 Now pair each of these sewn pieces together, matching right sides and front to front, back to back. Sew The top part of the pinafore first, starting under one arm and continuing the seam along the entire top seam until you meet where you started. Go back and clip the corners at the top of the straps. Turn the pinafore pieces right side out.


