|
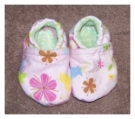
The Abigail Boot
Printable Baby Bootie Pattern
Introducing the Abby Boot - my new printable baby bootie pattern! These adorable booties will keep your baby's tootsie's warm all winter long! Make these boots sherpa style with a nice thick outer fabric paired with a fleecy or faux minky inner lining. These baby boots will make a fantastic addition to your lil' one's winter frocks, or a unforgettable gift to your favorite new Mamma.
They're warm and stylish too! Unlike some of the other Ugg inspired booties, the Abby boot has a buttoned flap over the front. Pair your fabrics with a eye catching button for a super stylish little shoe!
Abigail Baby Bootie Pattern & The How-To
Download the pattern below and follow the tutorial to begin creating your very own pair of Abby boots.

Printable PDF Pattern download - sizes 3 months up to 12 months... $4.95
 Materials and supplies list:
- 1/4 yard fabric will make 2-3 pairs of boots.
- fabric for outer boot
- soft fabric for inner boot
- elastic cording
- buttons
- sewing machine, thread, needle
Recommended Fabric:
Outer Boot - Denim, felt, suede, cordeuroy, cotton duck
Inner Boot - Fleece, 100% cotton
This pattern comes to you delivered as an instant PDF file download. Download the file and save it to your computer for unlimited use. The pattern includes sizes 3 months and up to 12 months.
To Make The Abigail Baby Boot
Begin by cutting all of the fabric pieces from their appropriate fabrics.
Cut a small piece of elastic cord and fold in half. Compare the cording to the size of your
button to determine a good size to cut. You want it to be able to stretch enough to fit over the
button after sewing.
Fold the elastic cord in half and pin in place at outer edge of the back of boot piece. Pin it so it
is sandwiched between the to layers with the loop facing inward.
Sew the inner and outer back of shoe together with right sides facing.
Turn the fabric right side out. Push out the corners and iron the edges smooth.
Sew the front/top of shoe pieces together with right sides together, sewing the seam along the
top edge. Sew the bottom/soles together with wrong sides facing. Sew the complete outer edge
of the bottom of shoe.

For the top part of the shoe, fold the fabric over so right sides are facing outward. Iron the fabric
to smooth out the seams.
By the dashed lines on the pattern, match up the middle of the top sole of the boot and the middle
of the top of the shoe. Pin in place with right sides facing inward. Begin sewing from the top middle
outwards towards the left side sole of the boot. Start at the middle again and begin sewing again, this
time sewing the right side of the top of the shoe to the boot. Repeat these steps onto the second boot.
With right sides together line up the middle of the back of the boot and the middle of the back of the
sole and pin in place. Starting at the middle sew outward toward the left side of the boot. Stop sewing
and reinforce the stitching when you reach where the top of the shoe is sewn to the sole. Let the back
of the shoe slightly overlap the front/top of the boot.
Begin sewing again from the back middle of the boot and sewing to the right side of the boot. Reinforce
the stitching when you reach where the front/top of the boot meets and is sewn to the sole.
Machine or hand stitch the left side (flap) of the back of shoe/heel piece onto the front/top of shoe piece
at their edges.
Turn the boots right side out. Hand sew a button onto the side opposite the elastic cord, being careful to
place the button so it sits aligned to where the elastic cord meets on the opposite side. Repeat for the
opposite shoe.
Make Your Own Baby Stuff Homepage > Make Baby Clothes > Baby Gown
|