 |
|||||
|
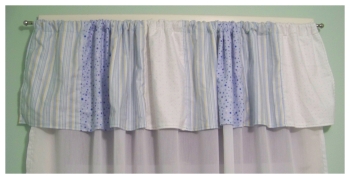
Cute Patchwork Baby Curtains
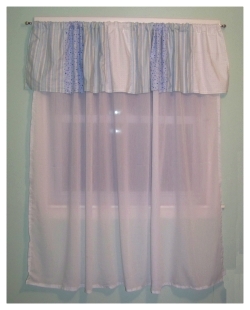 I used the scraps left over from 3 different fabrics to make these baby curtains. You can certainly use more or less, or even just keep it one fabric altogether if you like. That's the beauty of making your own curtains - it's super easy to just wing it! Choose a solid colored fabric for the bulk of the curtain. The patterned patchwork fabric will be used to create a kind of faux valance where as the solid colored fabric will be used as the actual window covering.
What you will need to get started:
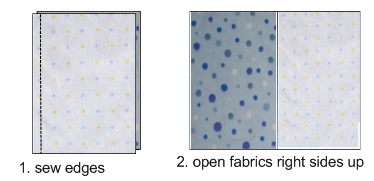
Start by measuring your window. Write down the measurements to help you determine how much fabric you will need and also to figure out what size you should create your curtain. First we'll go over creating the patchwork valance for the baby curtains. I cut my fabric scraps into rectangle that were 11 inches wide and 14 inches long. I chose to make them 11 inches wide to make it easy to judge the sizing. I knew that I would be sewing 1/2" in on the hems so after sewing each patch square would be exactly 10 inches wide. Since my windows were 35" wide, my aim was to make a valance piece that was 70 inches wide. So all I had to do was cut 7 pieces of fabric to create the patchwork valance. Easy! You can go with the measurements I used to make things easy, or just wing it! Making each patch piece in 11 measurements sure does make things a bit less complicated. Now just sew all of the patches together. Hold two fabric pieces so their right sides are facing each other (top of the fabric is facing in). You can pin them in place if you like. Sew the edges together about 1/2" in from the edge. Make sure and sew the long edges together.
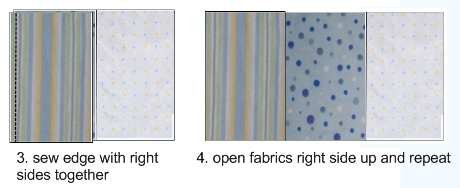
Open up the fabric and place another fabric piece right sides together to the patch on the outer end. Sew these together. Keep repeating this by sewing another patch to the end until you have a long chain of sewn together patches.
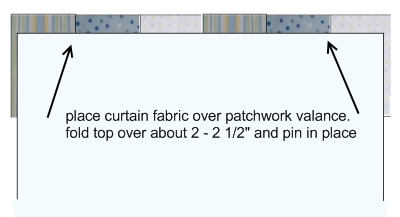
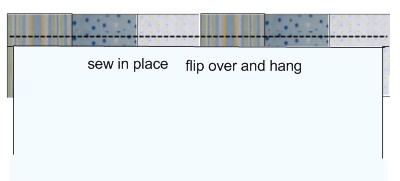
To finish off the valance simply iron both the bottom edge down about 1/4" - 1/2". Make sure you are ironing it to face towards the back of the fabric. Fold the edges over themselves again and pin in place. Sew along both edge to hold the hem neatly in place. Now repeat this same step for both the left and right edges of the fabric. To create the window covering part of the baby curtains first cut the fabric to the right dimensions. The width of the fabric should be the same as the patchwork valance that you just created. Fold the bottom edge of the fabric over about a 1/4" inch. Fold it over itself again to iron and pin in place. Sew along the fold to hold this hem in place. Repeat these steps for both the left and right edges of the curtain. Now go back to your faux valance. Fold the top edge of the valance down about a 1/4" and iron in place. Next fold the top edge over about 2 - 2 1/2". Iron the edge to hold it down in place. Now the tricky part. You are going place the window covering (solid) fabric on top of the valance so that it is sandwiched in between the top fold of fabric on the valance.
|
|
||||


Then why not use the button below, to add us to your favorite bookmarking service?