 |
||||
|
Baby Nursery Crafts
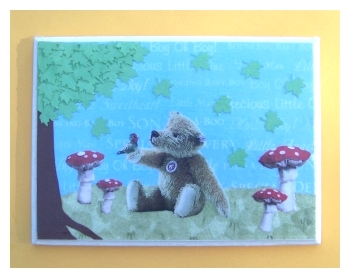
I chose to use decoupage to make a unique baby nursery art project to hang on the wall. I am doing my nursery in a "teddy bears picnic" theme. My vision is to use colors like green, blue, and brown throughout the room. I want to put up shelves with old fashioned teddy bears here and there throughout the room. There will be a bit of a woodland theme going as well. I plan to use picnic baskets as storage for things like blankets, burp cloths, and diapers.
If you do not know what decoupage is, well, it is a technique of layering glue and paper over a surface until it is all fused together, and smooth and glossy. The end result is fabulous. I made my decoupage wall art project using a wood surface I bought at the craft store. I sealed it by painting it. I then selected a couple of sheets of scrapbook paper to use for the background of my picture. I went online and surfed for pictures of teddy bears and woodland themes. I printed them out and then cut the shapes from plain old printer paper. I cut a piece of card stock into a tree trunk shape, and then used a maple leaf punch to punch out a bunch of leaf shapes for the tree. I then used decoupage finish to put my piece of nursery art together! How to Decoupage Materials needed:
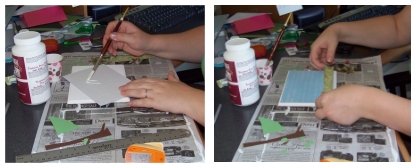
2. Apply the decoupage finish to the back of the paper you wish to attach to the surface. Piece by piece, thoroughly apply the glue to the back of the paper, then press it down onto your surface and smooth it out. Make sure there is not any excess glue underneath. I use a paint brush to apply the finish adequately. 3. After all of your pieces have been applied to the surface, paint an entire coat of decoupage finish (or glue medium) to the entire surface. Leave this to dry. 4. Keep applying coats of decoupage finish and let them dry over and over until you are satisfied with the finish. The surface should be smooth without any rough edges.
go from Baby Nursery Crafts back to DIY Baby Nursery page |
|
|||


Then why not use the button below, to add us to your favorite bookmarking service?