 |
||||
|
Free Baby Clothes Pattern:
|
||||
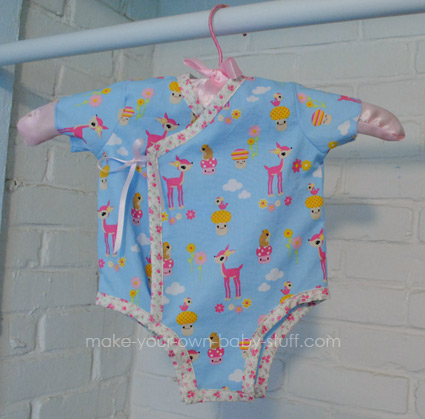
This kimono onesie pattern can be used with 100% cotton fabrics or stretch knits. The pattern calls for binding tape, but I really recommend creating your own as I did here. The pattern includes sizes for 3, 6, and 12 month sizes.
How to make your own binding tape? Oh it's so easy! And it is so worth the results. There are actually binding tape making machines available for relatively affordable prices, but I want to share the good old fashioned way to do it!
All you need is your clothes iron heated up and ready to go, and the complimentary fabric you've chosen to make the binding tape with. Cut the fabric to long strips 2" wide on the bias (diagonal). Iron the fabric in half and then open it back up again. It will have a line running straight down the middle of the strip. Folding one edge inwards iron the outer edge on one side to fold almost to the middle point. Repeat this step on the opposite side folding it only 3/4 of the way towards the middle. Fold the entire piece in half again (length wise) going back over the original fold (where we started). Viola! And here's a perfect trick to make a continuos bias tape for the kimono onesie.

Free Baby Clothes Pattern PDF Files:
Materials And Supplies Needed:
Let's Get Started!
1. Begin by printing out the free baby clothes pattern.
To print the free baby kimono onesie pattern for 3, 6, and 12 months print the pattern pieces onto regular 8.5 by 11 paper and then piece the sections together to create a full pattern. To do this simply match the pieces on the dotted lines and tape them together.
Once all of your pattern pieces are printed out, cut and/or pieced together follow each individual pieces instructions to lay the pieces on you fabric and cut them out.

2. Sewing the pieces together.
Start by pinning the front left and right pieces to the back piece with the right sides together. Sew the pieces together at the shoulder seam.
Next use a hot iron to fold the ends of the sleeves over by about an 1/8". Fold and press again hiding the raw edge. Stitch in place.

With the right sides together pin the sleeves to the shoulder. Sew in place. Sew from the end of the sleeve to underarm and down to the bottom edge where the leg goes.
3. Sew with Bias Tape.

Using your own homemade bias tape or some that you have purchased, finish the outer edges of the kimono onesie including the neckline, left and right side edges, and legs.
Start by folding the top edge of the garment over by about an 1/8 - 1/4", starting from one edge working through to the actual neckline and finishing at the opposite edge.
Pin the binding tape in place and begin sewing in place from the left edge of the garment across the neckline to the right edge. For those of you who need a primer on sewing bias tape:
Continue sewing bias tape around all raw edges of the garment.
4. Finish up by adding snaps, ribbons, velcro, or buttons.
You will need to sew some kind of snaps or buttons on the bottom part of the onesie to close the garment shut at the legs. I used simple sew on snaps. You could also opt for velcro, but I find snaps are best in the long run.To hold the left and right sides of the kimono onesie shut you will also need to add some snaps, buttons or ribbons, or even a combination of these.
I opted for pretty coordinated ribbons. I like the sweet look of little satin bows tied onto the front of the baby kimono. With a baby boy's garment I would probably choose snaps or sew-able velcro.
one should be placed on the inner portion of the onesie, as well as two on the left side, placing one at the top edge and one lower down towards where the leg meets.

I hope you enjoy this free baby clothes pattern! Please feel free to stop by and share pictures of your finished homemade baby clothes, suggestions, or pattern ideas!
Make Your Own Baby Stuff> Make Baby Clothes > Baby Kimono Onesie Pattern


Fun Projects and Tutorials


Then why not use the button below, to add us to your favorite bookmarking service?


