 |
|||||
|
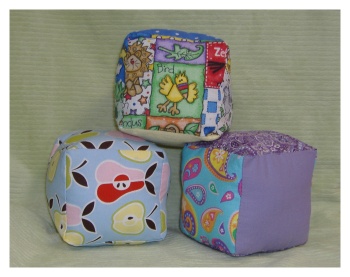
Make Simple Baby Blocks That Double as Baby Nursery Decorations
The great thing about these blocks is that they can double as baby nursery toys decorations until your baby is big enough to appreciate playing with them. Choose beautiful fabrics in colors and pattern to match your baby nursery theme, stack them on a shelf in the baby room, and you've got an instant nursery decoration. You will need about 1/4 yard of fabric per block. Of course you can make them all in one solid color or pattern, but it makes them interesting to pick a few different fabrics. It takes six squares of fabric to make up the baby blocks so a good plan is to pick 3 different fabrics and cut two squares of each to make up one block.
I have provided a printable pattern for this project with the instructions included. Start by making yourself a pattern template to cut your fabric with, or print the one I provided for you. To make your own pattern all you need is a to cut a piece of paper or card board into a 5" by 5" square. Cut around this square or trace the square onto your fabric using a sewing pencil and then cut the fabric from there. You will need to cut out six 5" squares to form one baby block. You can use the same fabric for all sides of the block, but I recommend cutting three sets of two from different fabrics. If you choose to make baby blocks that are all different colors and patterns a good plan is to buy 3 different matching fabrics, but buy enough to make three to six blocks.
 Start by sewing the blocks together to form a shape that looks like a cross. When sewing the seams together the fabrics should always be facing each other with the underside of the fabric facing out. Otherwise the project will not come out right. If you look to the diagram to the right you will see how I placed the different patterns away from each other. When the baby blocks are sewn together each square of identical fabric will be directly opposite from each other.
The easiest way to sew them together is to start by sewing pieces B and D to fabric square A. Then sew on C, E, and F. Once you have this part down on comes the trickier part, but don't worry it is still easy. Move on to sew together squares B and C. Place the seams together so that they are facing in towards each other and sew away. Keep going by sewing together C and D. Next is B and E, D and E, and so on... You get the picture. When you get to the very end at the last seam to sew together, only sew it 3/4's of the way shut. You want to leave an opening of about 2 inches. Now pull the block inside out. Use your finger to push out all of the corners. Take a look at your handy work! You're almost done! Hold the opening left in the last seam of the baby blocks open with two of your fingers and use your other hand to stuff bits of the fill into the baby blocks. Make sure and push the fill down into the corners of the blocks. Fill it nice and full to fill out all corners. This is also the time to add any bells or rattles, or noise making materials you might want to fill the blocks with as well. Be careful what you use. Keep in mind that you may need to send these blocks through the washing machine sometime in the future. To finish up you will hand sew the small opening left for filling. Use your fingers to hold the seams together. The seam should be folded inwards to match the rest of the seams. Use the same thread used to sew the entire block together to finish off the seams. Once the opening is sewn shut just snip off any loose threads.
go from Make Baby Blocks Toys back to DIY Baby Toys page |


|
||||
 Materials needed to make baby toys baby blocks:


Then why not use the button below, to add us to your favorite bookmarking service?
