 |
|||||
|
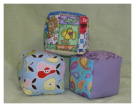
Make Your Own Decorative Baby PillowMaking your own baby pillow is a great way to add some decorative accents to your baby bedding set. It's a great way to add nice splashes of color. It is also a great way to compliment a baby bedding gift set. Make a matching pillow and blanket!
There is one occasion that you will be glad that you made this handmade pillow. Every mom will go through this at least once in your baby's infant life. Baby's first cold. It is inevitable that your baby will catch a cold at some point. All of you new mom's out there (I was one not too long ago) will call the doctor looking for guidance or an appointment. The doctor will tell you the same thing any time you call about a common cold. Here they are: 1. Use nose drops and a nasal aspirator to clear the air passage 2. Run a cold mist humidifier in the bedroom 3. Elevate the baby's head when he or she is sleeping Viola! You have a great use for your baby pillow. The pillows I make are constructed with just that in mind. Not just a decorative pillow. Here is a pillow that you can eventually use to aid in sleep, could even be used for tummy time, and because you will create this baby pillow over-sized it can later be used as a toddler bed pillow. The key is to make the pillow just the perfect size. Secondly it is all in the way you stuff the pillow to ensure that it will elevate the head, but not become a danger should your baby roll. Or really, the idea is to make it so that the baby will not roll off at all! A Very Simple Baby PillowMost pillows you will buy with any bedding set are very tiny little pillows. These are for decoration only. They are fine but no doubt about it, you absolutely must remove them from your baby's crib or bassinet before placing the baby in. Most of the time these pillows are so small that even a baby's head will not comfortably rest on them. Anyway, I want to show you how to make a very simple and basic baby pillow that you may even actually get some use out of. Start with the most simple way to create the pillow, and if want to make it more frilly and decorative I will show you how to go just a little further and add some ruffle, or simply make some handmade pillow cases. First of all, you do not necessarily need a pattern to make a simple baby pillow. All you need to do is think up a size that you think would be appropriate and go from there. Do you want a simple square pillow? Or maybe make a baby pillow that is rectangular so that it fits perfectly across the top of the crib to later become a baby sleep pillow. In this case you should go measure the width of your crib to figure out what size you want to make it. If you do indeed intend to use the pillow as a baby sleep pillow later on, I definitely recommend making the baby pillow somewhat over-sized. The key is to make the pillow so that the baby will be elevated, yet sinks in a little so that she will not roll off. Find something square shaped in your house, or simply use a measuring tape and eyeball your measurements. To make my pillow I used an over-sized pillow I had in my house. I laid the fabric out flat and then used a sewing marker to mark out where to cut the fabric. So here's what you will do: 1. Lay your fabric out flat. You should fold the fabric in half so that the right sides of the fabric are facing each other. The underside will be facing up. 2. Use a square shape or marker and measuring tape to mark of a square on your fabric 3. Use a good sharp pair of fabric scissors to cut out the square shape from your fabric You should have two identical square shapes of fabric. You can even cut two different fabrics out and sew them together so that you have a pillow with a bit more interest. Another great idea is to use just plain white or pastel cotton to make the pillow, and sew a bunch of decorative pillow cases to fit the baby pillow. This way you can frequently change the look of the pillow and also make it very easy to clean. Now that you have your fabric cut into the correct shape for your baby sleep pillow you are almost ready to sew it. If you are new to sewing do not be afraid to give it a try. Don't have a sewing machine? check out my page on how you can obtain a sewing machine for really cheap or even free.
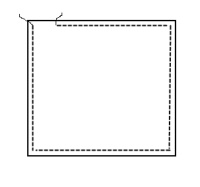 Start by pinning the fabric together so that the right sides are facing each other and the inside (underside) of the fabric is facing out. Use an all purpose thread matching your chosen fabric and sew all four edges of the pillow leaving an opening about 2 -4 inches wide.
Use your scissors to clip the corners of the pillow. Turn the fabric inside out and press the corners out a bit with your fingers. Now is the time to stuff the pillow. Buy a bag of polyester of cotton fill to stuff your pillow with. You can buy a pretty good sized bag enough to make two or three pillows quite inexpensively. Check the sewing notions aisle of any craft or sewing store. The key is to fill the baby pillow so that it is comfy, but under-filled. You want the baby to sink in a little so that he/she will not roll right off. If the baby pillow is nicely over-sized and filled correctly then you can sleep peacefully knowing that your baby is safe and snug. If the baby can roll off you risk the danger of her becoming stuck between the pillow and the crib bumper which could be quite dangerous. Whatever the circumstance you will want to check on your baby a few times during the night anyhow. To finish this baby pillow you must fold the open edges inward and pin them in place. Hand stitch the opening shut. If you are careful you can conceal these stitches completely. Once this opening is sewn shut you've got yourself a great baby sleep pillow or decorative baby pillow.
Adding a decorative touch to the baby pillow...You can certainly get away with making a simple baby pillow by using great decorative fabrics or even sewing baby pillow cases. But if you are one who like to take on a project, or maybe you just like adding a little more detail, adding a cute little ruffle is a very nice accent. Adding a ruffle to this baby pillow really isn't all that hard, but it does take a bit more care and and extra step as well. First off all, you will need to cut a whole new piece of fabric for this. What I recommend is to measure the length of your pillow fabric before you begin sewing. Whatever the length of the pillow is add about a quarter of its length to it. So if your pillow fabric is 14 inches after it is cut to it's shape, then you want each side of pillow ruffle to be around 18 - 19 inches in length. I would cut it's width to be around 6 inches. You will be folding this in half. After sewing the ruffle will be about 1 1/2 to 2" from the edge of the pillow.
If you need help in creating this pillow ruffle, I have created a printable semi-pattern. There is no way for me to make a complete pattern for this ruffle as A. I have no idea how big you may want your pillow, and B. there is not paper long enough to fit in your printer to be able to print the pattern out. Download and print the baby pillow ruffle pattern
Next get out an iron and ironing board. What you need to do is fold the ruffle in half and press it in place. Fold it perfectly in half, and continue folding and pressing moving all the way around the entire fabric loop until the whole thing is pressed in place. Now to really create the ruffle! You can do this either by sewing by hand or with your sewing machine. I think sewing it on a machine is easiest. Sew the entire length of the ruffle fabric so that the entire piece is bunches just like a true ruffle. Next match the edges up to the pillow to fit it to the correct lengths. A great way to do this is to match up the corners of the pillows with the hems where you sewed the edges of the ruffle fabric together to form the loop. Once the corners and hems are matched either pull the fabric out a little or tighten the ruffle up by pulling the threads.
Sew each edge as you move along and know that you are progressing correctly. Once you sew the first edge you will be able to remove the pins holding it in place and inspect your work. Fold back the fabric to see if the ruffle is still lying correctly. If everything looks good then finish pinning the next edge and about 5 inches of the third pillow edge as well. Keep repeating this until you get to the last open edge. Make sure and leave this edge open by about 2 - 4 inches to leave room for turning the whole piece inside out. When you are done sewing all of the edges just follow the instructions above to fill the pillow, and then hand stitch the opening shut just the same as a regular simple pillow.
|
|
||||
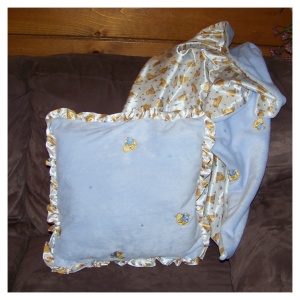 I know most doctors and specialists recommend that you not put anything in your baby's crib or bassinet. Not even a blanket. But there is indeed still use for a pillow to go along with your baby bedding set. Even if you make your own baby pillow solely for the purpose of decoration, I assure you, you will find a time when your baby will use this pillow. Many of us keep a few throw pillows on our beds and take them off when it is time for sleeping. And you can certainly do the same with you baby pillow.
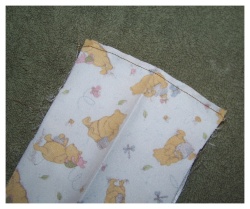 Next you will sew these four pieces of fabric together. You want to sew them together at their ends. Place the fabric together so that the right sides are facing each other and underside is facing out. Sew the edges together and then move on to the next to edges until all four are connected. If this was executed correctly you will have a fabric loop.
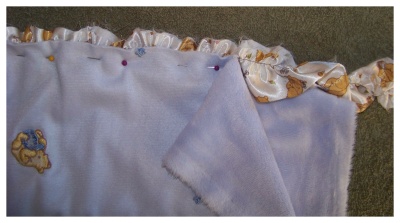


Then why not use the button below, to add us to your favorite bookmarking service?
