|
||||
Make Your Own Baby Crib BumpersThere is some controversy to the use of crib bumpers at all. I've heard them spouted a safety hazard for baby once they begin to move themselves about the crib. I like them for use in the first 3 months or so and then ditch them for noting more than the bed sheet and a pillow with a really good sleep sack. All the more reason to make your own! Lastly, making your own baby crib bumpers gives you room for customization and one of a kind creativity! You can design your crib bedding to exactly what you want to see in your nursery!
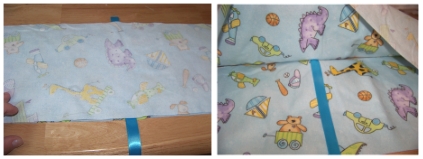
DIY Baby Crib Bumpers Pattern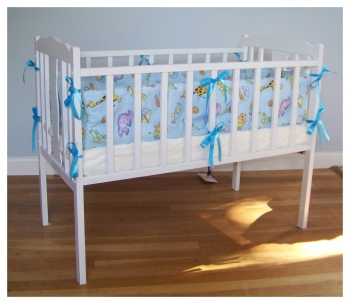 I created these bumpers with some super cute flannel I found on the clearance rack. I paired the bumpers with a fitted sheet made from super soft minky fleece for a cute and luxurious bedding set. All for less than $20!
Let me start by saying that these crib bumpers are not hard to make at all. If you have no sewing experience this is a great project to start with. All you need is a little attention to detail and a basic sewing machine. I want to show you not only how to make your own crib bumpers, but also how to make your own crib bumper pattern too. Making the pattern is so simple. Here's what you'll need:
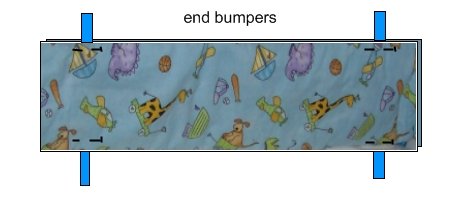
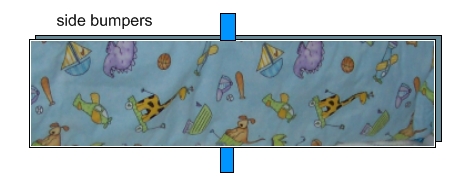
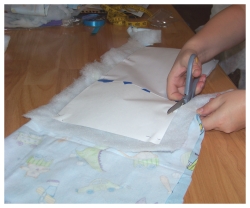
We'll start by making the DIY crib bumper pattern. So easy! Begin by measuring your crib from the inside corners. Determine how high up the side you want the bumpers to go. Now add one inch to the dimensions for a 1/2 inch seam allowance (for beginners - the seam allowance is how far from the side of the fabric you will sew your seams). To make your pattern all you will need to do is cut some large paper (newspaper> to the dimensions above. Make one pattern for the side bumpers and one for the end bumpers. I made my pattern by taping together regular white printer paper until it was the right length and width for my pattern. You'll also want to go back and hold the pattern against the crib to determine where you want the ties to be located. While holding the paper in place simply make a mark where the ties would make the most sense to tie the crib bumpers to the side rails. Viola! You've made yourself a baby crib bumper pattern!
Now To Get Sewing!After washing, drying, and ironing your fabric, you'll need to lie the fabric down flat on your work surface. I use a over sized cutting mat but you can easily use your kitchen table or the floor, or whatever works for you.
Pin the crib bumpers patterns down over both the fabric and the batting. Use the patterns as guidelines to cut the fabrics and batting. Cut two sets for the sides of the crib and two for the ends. Pin the layers of fabric together.
Now to add the ribbon ties. Just a note - you can choose to sew matching fabric ties. Basically just cut long rectangles of fabric, sew the edges and fold them right side out. I just prefer to use ribbon as it is so much easier and I like the decorative touch!
The layers should go like this:
For beginners: make sure to make a test strip of all of the layers of fabric to get the right sewing settings on your sewing machine. Keep testing stitches on the test samples of fabric until you have the perfect stitch for the baby crib bumpers project. You can use them as is at this point, but I actually like to go back and sew the corners together so it is one continuous bumper. I simply hand stitch the bumpers end to end with a coordinating thread until I've created a continuous circle. This is completely optional though!

|

|
|||
|
Enjoy This Site?
Then why not use the button below, to add us to your favorite bookmarking service? |
||||
|
|
||||
|
| ||||
 Lay the fabric down folded with the right sides (the front) facing inward. Now lay a sheet of cotton batting over this. The cotton batting can be whatever weight suits you. It all depends on how thick you want your bumpers to be.